Dang!

I haven’t posted much for the last month, mostly because I was very busy making things. Mostly boxes, in preparation for another round of the chairman’s challenge at the West Midlands Woodturners. The theme for this month was “a lidded box”.

OK, so what to do. Obviously most people would enter the typical thing, a more or less cylindrical box with a knob on the lid, and a very tight fit (a turner’s fit). You know, the one where you have to actually use some force to get the lid off, and it pops when it does come off.

So I thought, I am not going to do that. We need something different here. So I made several boxes, with different designs.

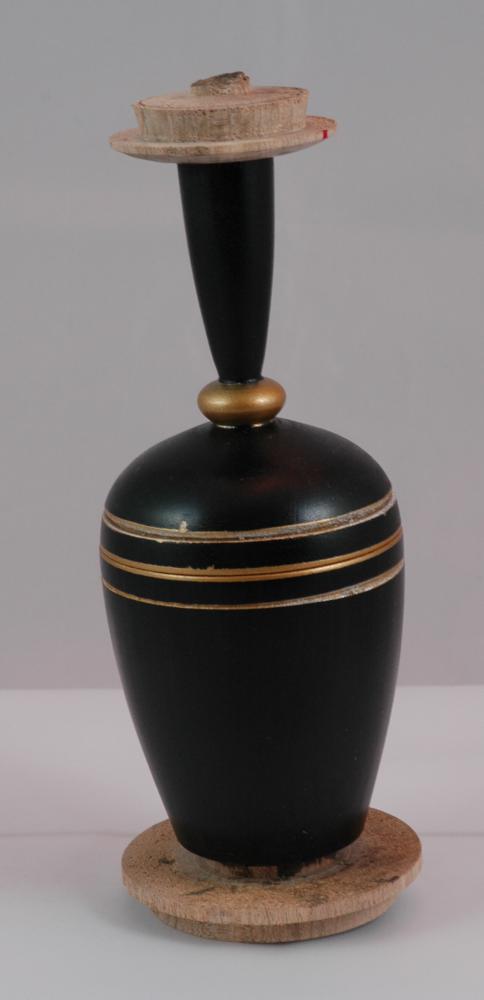
The first one is actually a copy from a box I found on google images, made by Fuji Seisakusho. I loved the simplicity of the form, and my copy came out well enough. Obviously I don’t have urushi lacquer, so I just used black stain and a wax finish on top. Interestingly enough, when I started polishing the wax, the remainders of the turpentine reacted with the spirit stain underneath, and my polishing  mop went all black. Need to remember that. The box and the lid were made from monkeypuzzle, and initially it looked really nice, with a branch coming through the lid. However, the monkeypuzzle wasn’t as dry as I thought it was, and by now the lid has warped badly (hence no picture), and I will have to make another lid.

Anyways, the second box was a very simple classic design and made from oak:

oak-box
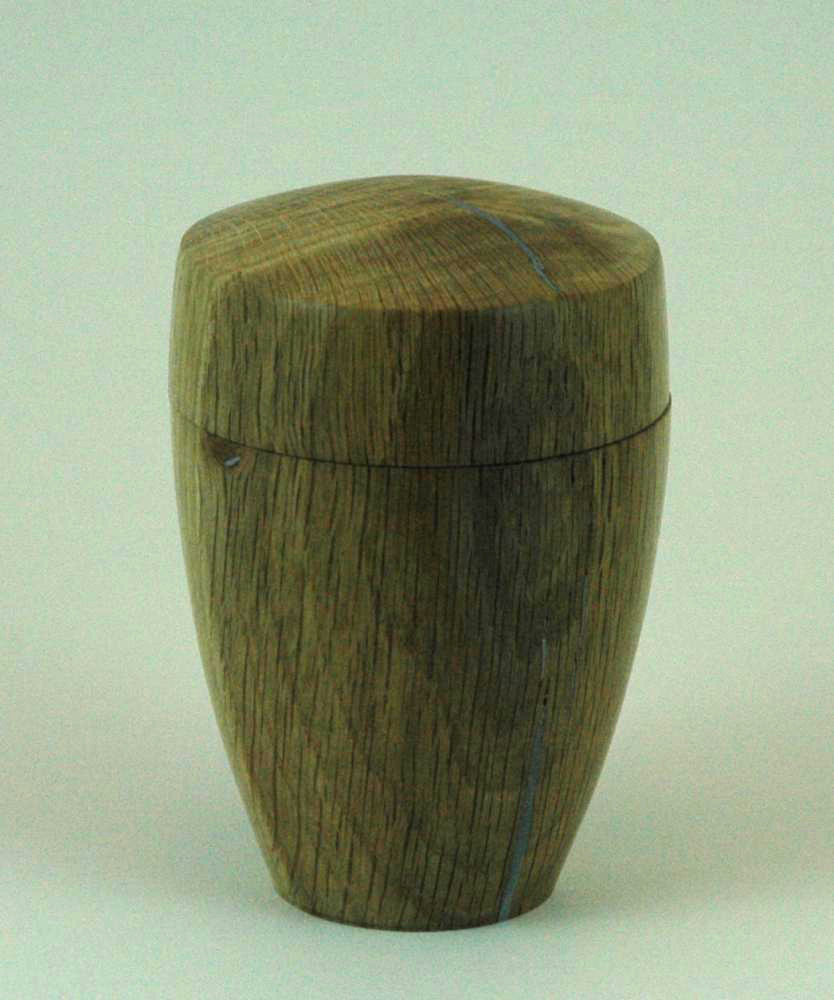
It looks a bit dull on the picture, because the lighting isn’t perfect, but it is actually a very nice little box. The cracks in the oak were filled with the usual aluminium powder and epoxy resin mixture. Classic shape, nice finish, but a bit boring, right?


So on to the next design:

mean-motherNow that was a lot more interesting! The shape came out of some doodling around with Helen, and the strong grain lines in the monkeypuzzle, combined with the simple geometric shapes create by intersections of circles (that’s really all it is) generates a very pleasing result.


art-deco-box
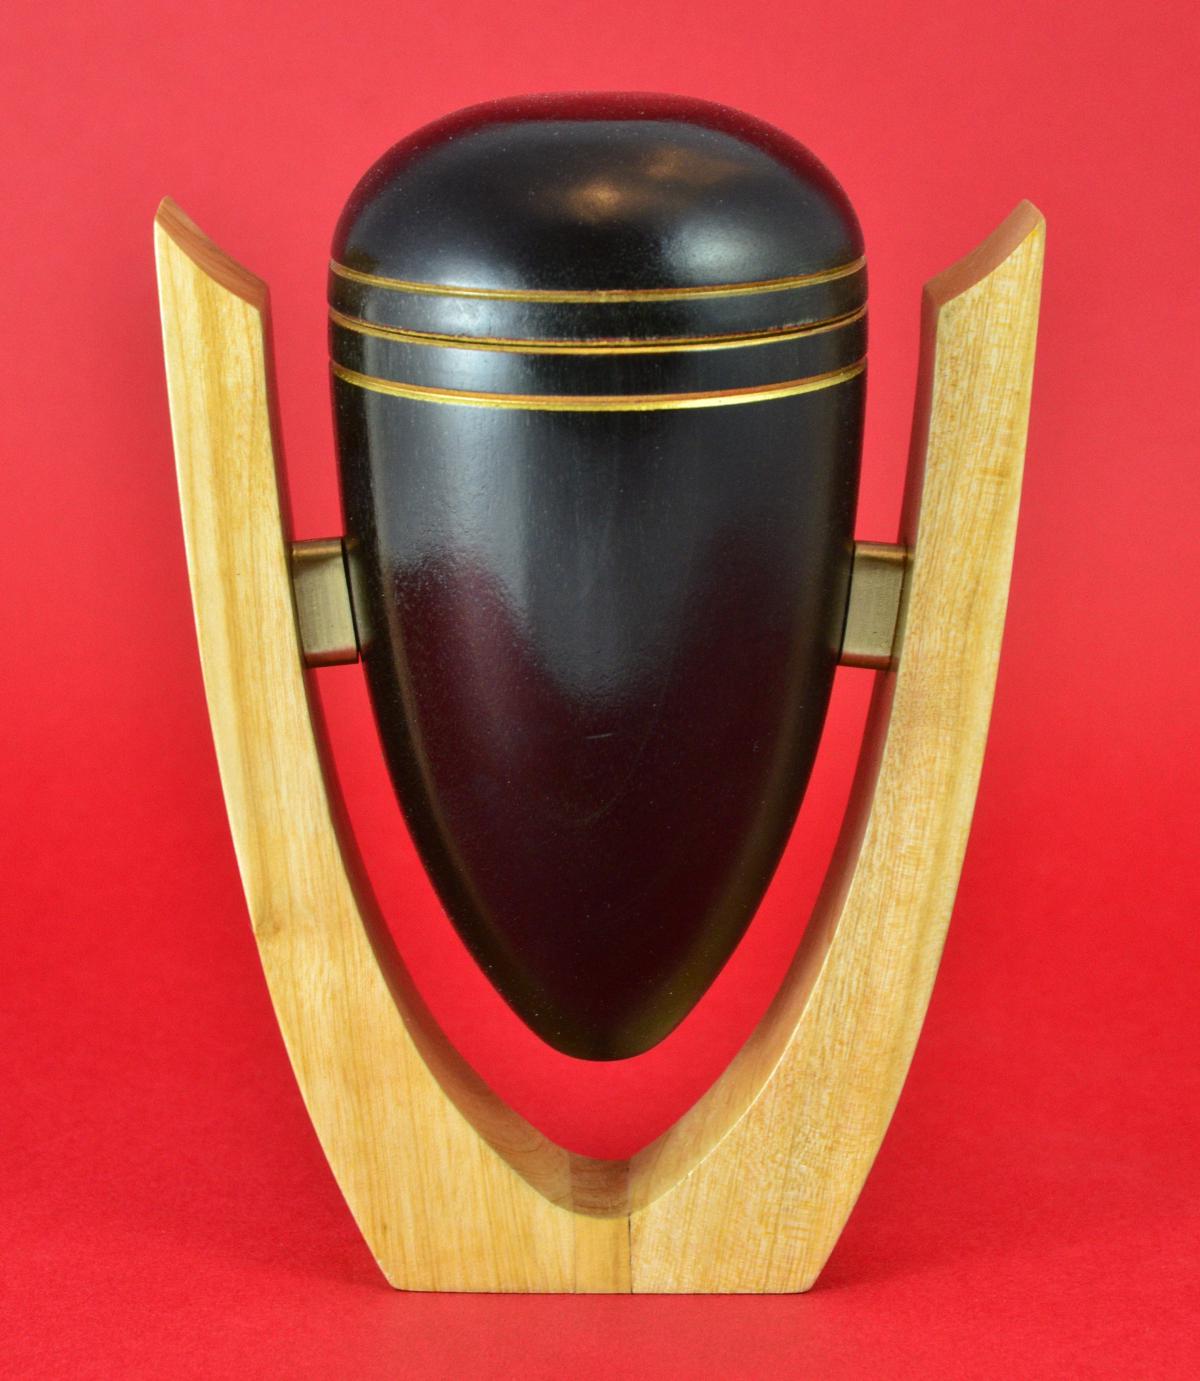
But I still wasn’t sure whether any of these would win the competition. So I started another design. This time a small, almost egg-shaped box, suspended in air by two brass struts linking it to a frame made from cherry . That’s the box I entered into the competition.

And because this box required a lot of steps with waiting time in between, I made another one, just for fun.

I had made a nice finial from a piece of cherry sapwood, which is almost white, and combined this with a piece of sycamore, stained dark red, and a lid made from laurel burr. Again, a classic shape, but quite elegant.

red-box-with-finial
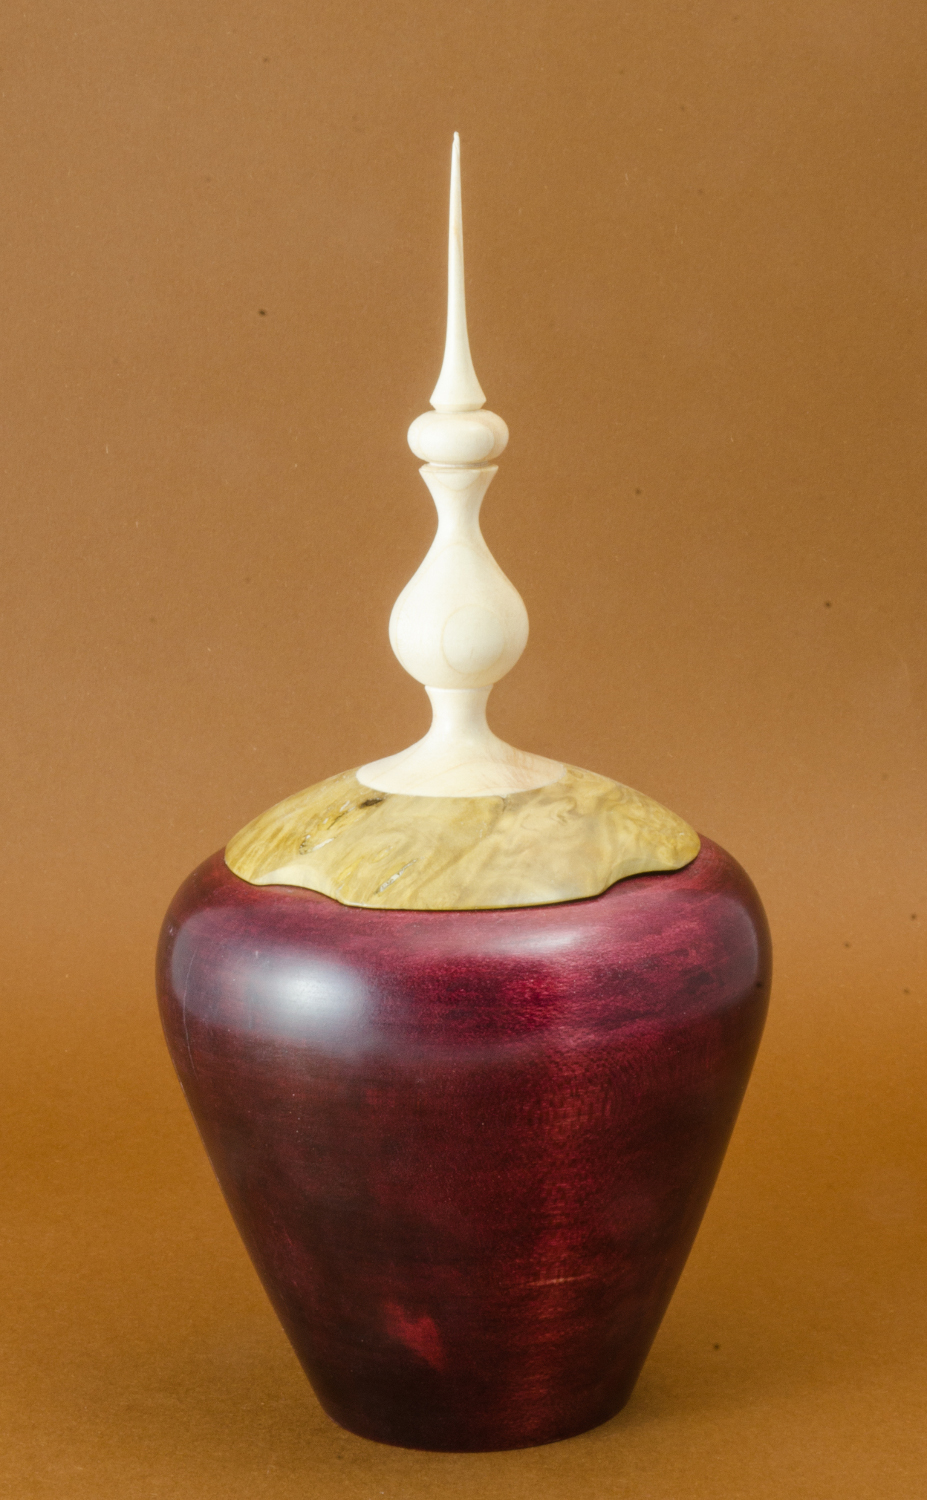
Right at the end of making the lid, disaster struck: a small piece of the burr broke out and (due to its size) was not to be found. What to do? I could have tried to fix this by taping the area and then filling it with superglue. But I knew that it would probably stick out badly, so I decided instead to make a feature of it, and sanded 4 small cutaways into the edge of the lid.

As said, I entered the suspended box into the competition. It got second prize, and when you see the box, you’ll know why. It’s not perfect. And then I got told by a fellow competitor that had I entered the last box (the one with the cherry finial), I would have won the competition. Dang!

And then, to confirm this, the box with the cherry finial was selected to go on display at the club stand during the Tudor Rose competition next month. Goes to show that what I think is my best piece is not necessarily what others think. Dang indeed!

Posted in General | Leave a comment

Wax polish

A while ago, I bought some micro-crystalline wax from Chestnut. It works well, and gives a very nice smooth finish, but it doesn’t go hard, and surfaces are easily scratched, and then it can be a bit of a mission getting it back to a nice finish.

So I started looking around for other waxes. Eventually I ended up buying a few ingredients and made my own wax finish. Here’s the recipe and the instructions:

Use a glass container (old jam jars are ideal, so keep them with the lids), place into a pan and fill the pan with about 1.5-2 inches of water. The jar (still empty) should just about stand on bottom of the pan. Heat up the water to boiling.

I used ounces for my weighing, but as long as the ratios are kept, any quantities will do. From a block of pure beeswax I cut 3 oz. of flakes and filled them into the jar. Flakes melt a little faster. Once this is liquefied completely, slowly add 1 oz of flakes of carnauba wax. Do this little by little, and stir until again completely liquefied. By now you will probably need to add some more water. A typical jam jar (454g size) will by now be 3 quarters full. Now get a second jar (unless you started with smaller quantities) and fill half of the liquid wax mixture into it, and put it aside. Switch the heat off, but keep the jar in the hot water.

The final ingredient is pure gum turpentine. Yes, the stuff that’s made from resin. Do NOT use any of the replacement products, they won’t work. Plus they smell awful compared to the real thing. Measure 3 ounces of that and stir slowly into the wax mixture. Then lift the jar out of the water and let it cool. As the wax sets, it changes colour from the orange liquid into a light yellow paste which looks a bit like honey.

Now put the other jar into the hot water, heat up the mixture until completely liquid, and measure and add 3 ounces of turpentine to that, stir, and let it cool. You now have two jars full of really nice wax finish.

You can play around with the quantities, to achieve slightly different results:

  • More carnauba wax will make the resulting polish harder, and you can achieve a glossier finish. In order to keep the polish in the jar at a usable level of hardness, you will have to also add more turpentine, probably about double to triple the amount of additional carnauba wax.
  • More turpentine will make the mixture more pliable, i.e. it will be easier to get it out of the jar. However, this will then also result in a finish that needs more time before you can buff it. Essentially what happens when you put the wax polish on a piece of wood, is that the turpentine will vaporize, and leave behind the wax components. More turpentine = more time for vaporization.
  • You can also add colour at this stage. Liming wax is created in this manner, but all sorts of colours are possible. Especially well work the spirit based stains from Chestnut.


Posted in Finishing | Leave a comment

Proper tools are not a luxury

The predecessor to Bleeding Forest was an ever small hollow form, from the same material. Initial hollowing went fine with just a bowl gouge, but then I wanted to get the shoulder thinned down, so that it wouldn’t look odd when I started with the carving.

At that time (around 2 months ago) I didn’t have proper hollowing tools. So I went and use one of many surplus allen keys, ground the short side into a useful scraper and mounted the key into a drill chuck. Then I set to work. Initially it went sort of OK, but because the handle is not aligned with the tip of the tool, there is substantial rotational force on the handle.

When I was about to put the finishing touches, suddenly the drill chuck started wobbling in my hand, and before I could say “jack shit”, my little vase had exploded in the most violent fashion (at around 1500rpm that is quite a spectacle. Luckily, as I was hollowing, I was well away from the general direction of the debris.

disaster

I now have proper hollowing tools (and a great deal more experience in using them), but I will always keep these pieces to remind me that I need to respect that piece of wood I am working on or it will have its way.

Posted in Turning | Leave a comment

The trouble with gold is …

… that in my case it comes out of a (cheapish) spray can, cuz I can’t afford the real thing.

I bought myself two spray cans, one with silver, the other with gold, and thought, let’s see what we can do with this. The silver works great (see here), but the gold is another story altogether.

It splashes around, and instead of a fine spray, the paint comes out in rather large(ish) blobs. What’s worse, it creeps like hell, and if it hits an uneven surface, it separates into its components. Have a look for yourself:

gold is badThis was (and still is) such a nice shape, but I made several mistakes. The first one was to allow time to pass between the initial shaping and putting the finishing touches on. That allowed the shape to warp slightly, and when I tried to cut the little grooves (to visually hide the place where the lid meets the box) the grooves got ragged and of uneven width.

The second mistake was to overestimate the bond of my masking tape and also my ability to shape it precisely how I wanted it. You can see this in the uneven border of the golden spray paint around the bead in the lid, and the lack of masking tape bond is visible in the strips around the lid and body.

The result is rather ghastly, and unfortunately little can be done now to save the piece. The walls of the box and lid are so thin already that trying to take the grooves of would inevitably result in the whole thing collapsing on itself. Well, another few lessons learned.

Posted in Decoration | Leave a comment

Show me the honey!

Ladies and Gentlemen,

you are looking at a winner. That’s right, I have today won my first competition. OK, it was only the novice category of the chairman’s challenge at the West Midlands Wood Turners, but then, you’ve got to start somewhere. So here’s the winning entry:

laminated-honey-dipperMade from a hard indian maple, with slices of mahonia and african blackwood for the bee’s body, finished with mycrocristalline wax and polished to a medium gloss.

This beat the competition by such a margin, that I was told I could go straight to the intermediate section. Yes, sir!


Posted in Turning | Leave a comment